This tool is used to change an object’s dimension, either keeping its original proportions or distorting it horizontally or vertically. |
|
|
|
|
|
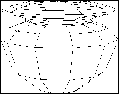
Original object |
Scaled object maintaining its original proportions |
Vertically scaled object |
|
|
|
| ||
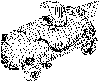
Original object |
Scaled object maintaining its original proportions |
Horizontally scaled object | ||
Scale tool usage examples
![]()
This tool uses the Dynamic Geometry properties of the selected object.
For more information, see the chapter User Manual/ The Objects/ Dynamic Geometry.
Usage:
1. Selecting the element or part of the element to scale.
· Using the Wand, click on the element. It becomes the current object.
· To scale only part of the element: Use the Lasso or the Bullseye (clicking on the corresponding icon in the Assistant Palette or through the mouse – right mouse button on PC; Option + mouse click on Mac).
2. Selecting the tool.
Click on the icon depicting the Scale tool in the Tools Palette.
A bounding box now surrounds the selection.
3. Dynamic Geometry properties
Depending on how you created the current object, you can work with its Dynamic Geometry properties. This means that you can work on one of the following four finishing levels:
1 – Rough structure
2 – Smoothed structure
3 – Rough object
4 – Smoothed object
In the “Dynamic Geometry” palette, click on the icon depicting the finishing level on which you want to work.
![]()
If you decide to work on your model at finishing level “n”, then you will no longer be able to work on levels “1” to “n-1” (the icon of the disabled levels will disappear).
![]()
For more information, see the chapter User Manual/ The Objects / Dynamic Geometry.
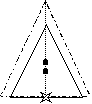
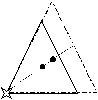
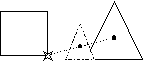
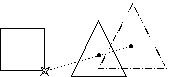
4. Reference point positioning (optional).
The reference point and the center of gravity of the object define the moving axis.
The center of gravity of the object is moved along this axis with a distance that is proportional to the scaling applied to the object.
Position the reference point according to the desired results.
Examples:
|
Reference point |
||
|
Center of gravity of the object | ||
|
Object to be scaled | ||
|
Center of gravity moving axis | ||
|
Scaled object | ||
|
|
| ||
Reference point on the bottom of the object (default position) | |||
|
|
|
Reference point on a point of the object | |
|
|
|
Reference point on the center of gravity of the object to be scaled | |
|
|
|
Reference point on a point of another object of the scene | |
The reference point icon is a little cross: ![]()
The Amapi 3D default position is the bottom of the center of the face of the cube.
If you want to move this point:
· On PC: Click the right mouse button. On Mac: Press the Option key and simultaneously click the mouse button. The cursor will be changed to a cross.
· Position the cursor at the new reference point position. Click to validate.
5. Choosing the scaling mode (proportional, horizontal or vertical).
|
|
|
|
Proportional scale
|
Horizontal distortion |
Vertical distortion |
There are two ways to set the scaling mode:
· 1st method: Click on one of the three icons of constraint along an axis.
The “Constrain along the horizontal axis” icon defines a horizontal distortion.
The “Constrain along the vertical axis” icon defines a vertical distortion.
The “No constraint” icon defines a proportional scaling.
· 2nd method:
Press the spacebar to switch from one scaling mode to another.
· The two axes are displayed (red and green): Proportional scaling
· Only the horizontal axis is displayed (red): Horizontal scaling
· Only the vertical axis is displayed (green): Vertical scaling
6. Scaling.
The data palette displays the width, the height and the depth of the current object. There are several ways to set these values:
With the mouse:
· Click to take a point on the object or on the bounding box.
· Move the cursor, you will move the object bounding box. The coordinates displayed in the numerical window may help you.
· Click to validate the new location
“Remote” interaction
You can switch from one data field to another by pressing the spacebar. The editable data will appear darker. You can change the values as follows:
· The Remote Control (see User Manual Tools/The data window/Distant interaction/The remote control)
· The Slider in the numerical dialog (See chapter User Manual/ Data window/ Modify a numeric data/ Remote interaction/ The slider).
Numerical setting:
If you prefer to specify the value numerically,
Press the Tab key.
Enter a numerical value.
Validate.
7. Ending the tool action.
Validate or put the tool aside to end the tool action (depending on the interface). See chapter User Manual/Tools/Generic use of a tool/How do you end a tool action?
![]()
The Scale tool is one of the tools that allows you to change the current object while you are using the tool.
To change current object while within the tool:
· Press Shift+ESC. The cursor switches to the Wand.
· Click on another object; it becomes the current object.
![]()
If, while selecting the Scale tool, you also press the Option key, Amapi 3D will automatically create a copy of the current object and the scaling operations will be applied to the copy generated. The original object will reappear at the next screen redraw.
|
Practical exercises:
|